Difference between revisions of "CONTROLS/Macros"
From MatterControl Manual
< CONTROLS
m (MatterHackers moved page G-Code Macros to Controls/Macros) |
|||
| Line 1: | Line 1: | ||
| − | + | __NOTOC__{{DISPLAYTITLE:Macros}}Macros are snippets of saved code which can be called with the click of a button instead of having to be typed repeatedly. | |
| − | + | The Macros of the Controls pane section is where the user creates and stores these macros. | |
| − | + | To learn more about G-Code and its utility in 3D printing, check out this resource: http://reprap.org/wiki/G-code | |
| − | + | == Macros Pane == | |
| − | + | [[File:Macros-example.png|right|framed|<center>Macros pane containing example macros for the Rostock MAX V2</center>]]Once macros have been created, they will appear under the '''Macros''' title. | |
| − | + | The screenshot to the right shows an example of several macro buttons for the Rostock MAX V2. | |
| + | <br clear=all> | ||
| + | == Macro Editor == | ||
| − | === | + | [[File:Macros-blank-ss.png|right|framed|<center>By default, the Macros section has no buttons.</center>]]To access the Macro Editor, click the pencil icon ([[File:Pencil-edit.png]]) next to the word '''Macros'''. This will open the Macro Presets window. |
| + | <br clear=all> | ||
| + | === Macro Presets Window === | ||
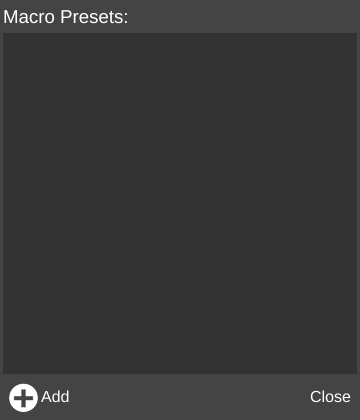
| − | + | [[File:Macros-Presets-blank-ss.png|none]]To add a new Macro, click the '''Add''' button. This will open the '''Edit Macro''' window. | |
| − | + | ||
| − | [[File: | + | === Edit Macro Window === |
| + | |||
| + | [[File:Macros-Editor-ss.png|none]] | ||
| + | |||
| + | ==== Macro Name ==== | ||
| + | |||
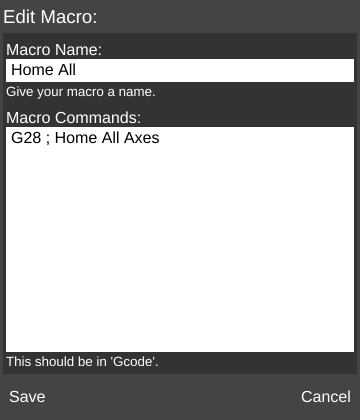
| + | Enter a unique name for the macro. | ||
| + | |||
| + | ==== Macro Commands ==== | ||
| + | |||
| + | Enter [[G-Code]] command(s) in this field. | ||
| + | |||
| + | Can be multiple lines long. | ||
| + | |||
| + | ==== Save ==== | ||
| + | |||
| + | Click the '''Save''' button to add the button to the Macros section. | ||
| + | |||
| + | ==== Cancel ==== | ||
| + | |||
| + | Click the '''Cancel''' button to discard changes. | ||
[[Category:Features]] | [[Category:Features]] | ||
| − | |||
Revision as of 17:56, 14 January 2016
Macros are snippets of saved code which can be called with the click of a button instead of having to be typed repeatedly.
The Macros of the Controls pane section is where the user creates and stores these macros.
To learn more about G-Code and its utility in 3D printing, check out this resource: http://reprap.org/wiki/G-code
Macros Pane
Once macros have been created, they will appear under the Macros title.The screenshot to the right shows an example of several macro buttons for the Rostock MAX V2.
Macro Editor
To access the Macro Editor, click the pencil icon (
Macro Presets Window
To add a new Macro, click the Add button. This will open the Edit Macro window.Edit Macro Window
Macro Name
Enter a unique name for the macro.
Macro Commands
Enter G-Code command(s) in this field.
Can be multiple lines long.
Save
Click the Save button to add the button to the Macros section.
Cancel
Click the Cancel button to discard changes.


